Date: 11/29
在JSP中為了簡化使用者開發JSP內建
9種物件供開發者使用
pageContext 頁面內容容器
request 請求者資訊
response 用戶端回應資料
session 儲存使用者資訊
application 使用者共同資訊
config 初始化參數伺服器設定
out 輸出
page
exception
page → 跳躍無效,一個頁面
request → 一次請求,跳躍然有效
session → 一次階段範圍中儲存 新開browser無效
application →整個 伺服器上儲存 all user使用
/===============================================/
2015年11月29日 星期日

2015年11月23日 星期一
JAVA SL-314_11/22
JAVA SL-314
Date: 11/22
/*
<%!
public static final String INFO="www.google.com";
int x=0;
%>
<%
out.println("<h2>x="+x+++"</h2>"); //敘述
%>
<%!
public int add(int x, int y){
return x+y;
}
%>
<%!
class Person {
private String name;
private int age;
Person(String name, int age){
this.name=name;
this.age=age;
}
public String toString(){
return "name="+this.name+"; age="+this.age;
}
}
%>
<%!
out.println("<h3>INFO"+INFO+"</h3>");
out.println("<h3>3+5="+add(3,5)+"</h3>");
out.println("<h3>"+new Person("name",18)+"</h3>");
%>
*/
/====================================================/
想要在自己的 NB 上架 Drupal 及 Wordpress 等 Open Source 免費架站軟體的開發測試
環境,以前都是從 Apache 、PHP 、 MySQL 、phpMyAdmin 一個一個的安裝設定,
還蠻麻煩的,而且也容易出問題,現在直接用 AppServ 四合一包還蠻方便,安裝快速
又容易,很快就可以準備好自己的開發測試環境了 !
1. 先下載appserv-win32-2.5.10.exe:
https://drive.google.com/file/d/0B8Dfp4n5Q35CVjY0SjV3QmljTDQ/view?usp=sharing
2. 執行安裝 ---> 以系統管理員執行
appserv-win32-2.5.10.exe
3. 點按next

4. 點按I agree

5. 依照下列指示安裝下一步


6. 安裝完成後,可以查看工作管理員--->服務--->Apache2.2、mysql


7. 服務都起來後,執行google輸入localhost,就會看見以下畫面,再點選指示

8. 輸入root,及密碼

9. AppServ 2.5.10 安裝測試成功

/====================================================/
Page指令
1. contemt Type ---> 定義JSP字元的編號和頁面MIME的回應型態。
2. import ---> 要載入那些套件。
3. pageEncoding ---> JSP頁面的字元編碼。
3. info ---> 資訊。
4. language ---> 指令碼語言。
5. is ErrorPage ---> 此頁面是否為出錯的處裡頁true處理,false則無法處理。
/====================================================/
include指令 => @
可分為動態包含及靜態包含:
1. 靜態包含---> 就是包含一個文字或JSP檔案,過程是靜態的,
例如: JSP檔案、html檔案、文字檔。
2. 動態包含---> 是使用<jsp: include>可以將靜態及動態頁面一
起包含進來,分別處裡,先處理靜態頁面結果。
ex:
<h3>靜態包含操作</h3>
<%@ include file = "info.html"% >
<%@ include file = "info.inc"%>
※page,include => %後都要加@
/====================================================/
receive_param.jsp
/*
<html>
<head>
</head>
<body>
<h1>參數一:
<%= request.getParameter("name") %></h1>
<h2>參數二:
<%= request.getParameter("info") %></h2>
</body>
</html>
Date: 11/22
/*
<%!
public static final String INFO="www.google.com";
int x=0;
%>
<%
out.println("<h2>x="+x+++"</h2>"); //敘述
%>
<%!
public int add(int x, int y){
return x+y;
}
%>
<%!
class Person {
private String name;
private int age;
Person(String name, int age){
this.name=name;
this.age=age;
}
public String toString(){
return "name="+this.name+"; age="+this.age;
}
}
%>
<%!
out.println("<h3>INFO"+INFO+"</h3>");
out.println("<h3>3+5="+add(3,5)+"</h3>");
out.println("<h3>"+new Person("name",18)+"</h3>");
%>
*/
/====================================================/
想要在自己的 NB 上架 Drupal 及 Wordpress 等 Open Source 免費架站軟體的開發測試
環境,以前都是從 Apache 、PHP 、 MySQL 、phpMyAdmin 一個一個的安裝設定,
還蠻麻煩的,而且也容易出問題,現在直接用 AppServ 四合一包還蠻方便,安裝快速
又容易,很快就可以準備好自己的開發測試環境了 !
1. 先下載appserv-win32-2.5.10.exe:
https://drive.google.com/file/d/0B8Dfp4n5Q35CVjY0SjV3QmljTDQ/view?usp=sharing
2. 執行安裝 ---> 以系統管理員執行
appserv-win32-2.5.10.exe
3. 點按next


6. 安裝完成後,可以查看工作管理員--->服務--->Apache2.2、mysql


7. 服務都起來後,執行google輸入localhost,就會看見以下畫面,再點選指示


/====================================================/
Page指令
1. contemt Type ---> 定義JSP字元的編號和頁面MIME的回應型態。
2. import ---> 要載入那些套件。
3. pageEncoding ---> JSP頁面的字元編碼。
3. info ---> 資訊。
4. language ---> 指令碼語言。
5. is ErrorPage ---> 此頁面是否為出錯的處裡頁true處理,false則無法處理。
/====================================================/
include指令 => @
可分為動態包含及靜態包含:
1. 靜態包含---> 就是包含一個文字或JSP檔案,過程是靜態的,
例如: JSP檔案、html檔案、文字檔。
2. 動態包含---> 是使用<jsp: include>可以將靜態及動態頁面一
起包含進來,分別處裡,先處理靜態頁面結果。
ex:
<h3>靜態包含操作</h3>
<%@ include file = "info.html"% >
<%@ include file = "info.inc"%>
※page,include => %後都要加@
/====================================================/
//include.jsp<br />
<%@ page language="java" import="java.util.*" pageEncoding="BIG5"%>


<!DOCTYPE HTML PUBLIC "-//W3C//DTD HTML 4.01 Transitional//EN">
<html>
  <head>
  </head>

  <body>
    <%
     int x=10;
    %>
    <h1>include.jsp--x<%=x%></h1>
  </body>
</html>
/====================================================/receive_param.jsp
/*
<html>
<head>
</head>
<body>
<h1>參數一:
<%= request.getParameter("name") %></h1>
<h2>參數二:
<%= request.getParameter("info") %></h2>
</body>
</html>
*/
/====================================================/
App2.jsp (動態)
/*
<html>
<head>
</head>
<body>
<h1>動態包含操作</h1>
<%
String name="Google";
%>
<jsp:include page="receive_param.jsp">
<jsp:param name="name" value="<%= name %>"/>
<jsp:param name="info" value="www.google.com"/>
</jsp:include>
<%
int x=100;//變數
%>
<h1>App2.jsp...x<%=x %></h1>
<jsp:include.page="include.jsp"/>
</body>
</html>
*/
/====================================================/
App2.jsp (靜態)
/*
<html>
<head>
</head>
<body>
<h1>靜態包含操作</h1>
<%
int x=100;//變數
%>
<h1>include.jsp...x</h1>
<include.page="include.jsp"/>
</body>
</html>
*/
/====================================================/
靜態 ---> 全部包含再處理。
動態 ---> 先處理,再把結果包含進去。
/====================================================/
跳轉指令語法
不傳遞參數
<jsp:forward page="要跳轉的檔案or運算式"/>
要傳遞參數
<jsp: forward page="要跳轉的檔案or運算式"/>
<jsp: param name="參數名稱" value="參數名稱" value="參數內容"/>
</jsp: forword>
/====================================================/
2015年11月15日 星期日
JAVA SL-314_11/15
JAVA SL-314
Date: 11/15
※ HTTP/FTP/HTTPS
基於請求/回應模型
沒有狀態的通訊協定
| HTTP| 請求URL| 請求的資源 | HTTP版本
http:// /download.do?file… /HTTP 1.1
---> 向伺服器取得指定的資源
1. 可以請求的參數有限 (依brower的版本而有不同)
2. 不適合大量的資料
※ POST
請求發佈(POST)資訊給伺服器
1. 大量的資料發送都會使用POST
2. 請求資訊移到主體,網址列不會出現請求參數
3. 一般即使請求資料不多也大都會採用POST
※GET(等冪) or POST(非等冪)
1. 過長的請求參數 ---> POST
2. 較敏感的參數資料 ---> POST
3. 希望可以讓使用者設定書籤,以便日後瀏覽 ---> GET
4. 考慮Browser會cache資料問題 ---> GET

 ※採用MVC架構來設計軟體系統會比較好維護,擴充及除錯。
web---> 實體server → http伺服器 → web容器 ---> servlert
Java → JVM
Servlert / JSP --->web容器 ----> my eclipse
php容器---> apahe
ASP.NET容器 ---> IIS
/========================================================/
註解
1. // 單行
2. /*...*/ 多行
3. <!--xoo-->
/========================================================/
Script
<% %>
定義區域變數,敘述
2. <%!%>
定義全域變數,方法,類別
3. <%=%>
定異常數或運算式
/========================================================/

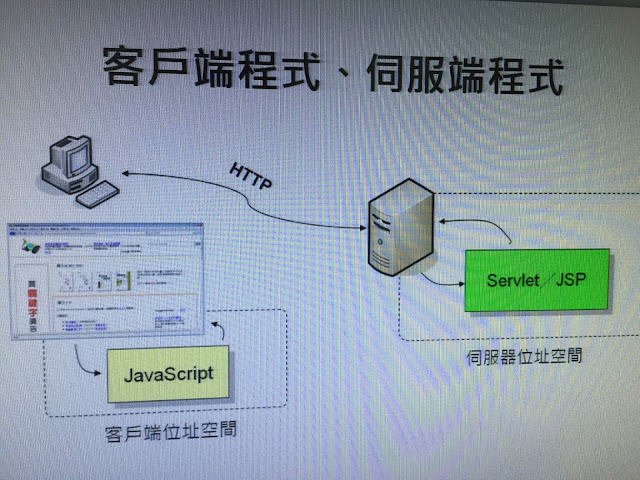
/========================================================/
使用MyEclipse
版本: MyEclipse 8.5

接下來讓我來lab吧!
首先開啟MyEclipse,接著在WebRoot建立新的html

/========================================================/
再到google輸入 ---> http://aaronhuang:8080/DEMO/MyHtml.html

再輸入123

Date: 11/15
※ HTTP/FTP/HTTPS
基於請求/回應模型
沒有狀態的通訊協定
| HTTP| 請求URL| 請求的資源 | HTTP版本
http:// /download.do?file… /HTTP 1.1
---> 向伺服器取得指定的資源
1. 可以請求的參數有限 (依brower的版本而有不同)
2. 不適合大量的資料
※ POST
請求發佈(POST)資訊給伺服器
1. 大量的資料發送都會使用POST
2. 請求資訊移到主體,網址列不會出現請求參數
3. 一般即使請求資料不多也大都會採用POST
※GET(等冪) or POST(非等冪)
1. 過長的請求參數 ---> POST
2. 較敏感的參數資料 ---> POST
3. 希望可以讓使用者設定書籤,以便日後瀏覽 ---> GET
4. 考慮Browser會cache資料問題 ---> GET


web---> 實體server → http伺服器 → web容器 ---> servlert
Java → JVM
Servlert / JSP --->web容器 ----> my eclipse
php容器---> apahe
ASP.NET容器 ---> IIS
/========================================================/
註解
1. // 單行
2. /*...*/ 多行
3. <!--xoo-->
/========================================================/
Script
<% %>
定義區域變數,敘述
2. <%!%>
定義全域變數,方法,類別
3. <%=%>
定異常數或運算式


/========================================================/
使用MyEclipse
版本: MyEclipse 8.5

接下來讓我來lab吧!
首先開啟MyEclipse,接著在WebRoot建立新的html

//MyHtml.html

<html>
  <head>
    <title>HTML_Javascript</title>
  <script language="javascript"><!--Javasript-->
   function show(){   //定義函數
   var show = document.myform.name.value;  //取得輸入內容
    alert("輸入的內容是:"+show);
   }
  </script>

  </head>

  <body>
    <form action="" method="post" name="myform">
               請輸入內容:<input name="name" type="text" />
          <input onclick="show()" type="button" value="顯示" />
    </form>
</body>
</html>
/========================================================/
再到google輸入 ---> http://aaronhuang:8080/DEMO/MyHtml.html

再輸入123

2015年10月19日 星期一
JAVA SL-275_10/18
JAVA SL-275_10/18
Date: 10/18
//============================================================//
常用的 Java 圖形 Lib (java 7.0 版以後,兩種可以混用):
AWT
Swing
一般功能表是由三種類別所建立:
MenuBar
Menu
MenuItem
java.lang.Object
java.awt.MenuComponent → java.awt.MenuBar
java.awt.MenuComponent → java.awt.MenuItem ─ java.awt.Menu
設計的參數及概念:

監聽事件 (event listener) 架構圖:

//============================================================//
Date: 10/18
//============================================================//
常用的 Java 圖形 Lib (java 7.0 版以後,兩種可以混用):
AWT
Swing
一般功能表是由三種類別所建立:
MenuBar
Menu
MenuItem
java.lang.Object
java.awt.MenuComponent → java.awt.MenuBar
java.awt.MenuComponent → java.awt.MenuItem ─ java.awt.Menu
設計的參數及概念:

監聽事件 (event listener) 架構圖:

//============================================================//
//app_1.java
import java.awt.*;
import java.awt.event.*;

public class app_1 extends Frame implements ActionListener{
 static app_1 frm=new app_1();
 static Button btn1=new Button("Yellow");
 static Button btn2=new Button("Green");
 static Button btn3=new Button("Exit");
 public static void main(String args[]){
  btn1.addActionListener(frm);
  btn2.addActionListener(frm);
  btn3.addActionListener(frm);
  frm.setTitle("ActionEvent");
     frm.setLayout(new FlowLayout(FlowLayout.CENTER));
     frm.setSize(300,200);
     frm.add(btn1);
     frm.add(btn2);
     frm.add(btn3);
     frm.setVisible(true); //一定要show出,不然無法顯示。
     frm.addWindowListener(new WindowAdapter(){  //視窗右上角x功能
      public void windowClosing(WindowEvent e){
       System.exit(0);
      }
     });
 }
 public void actionPerformed(ActionEvent e){
  Button btn=(Button)e.getSource();//取得事件來源物件。
  if(btn==btn1)
   frm.setBackground(Color.YELLOW);
  if(btn==btn2)
   frm.setBackground(Color.GREEN);
  if(btn==btn3)
   System.exit(0);
 }

}
//============================================================////app_2.java
import java.awt.Checkbox;
import java.awt.CheckboxGroup;
import java.awt.*;
import java.awt.event.*;
public class app_2 extends Frame implements ItemListener{
static app_2 frm=new app_2();
static Checkbox ckb1=new Checkbox("Java");
static Checkbox ckb2=new Checkbox("PHP");
static Label lab=new Label("Select one");
public static void main(String args[]){
CheckboxGroup grp=new CheckboxGroup();
frm.setSize(300,200);
frm.setTitle("app_2 Programmer");
frm.setLayout(new FlowLayout(FlowLayout.CENTER));
ckb1.setCheckboxGroup(grp);
ckb2.setCheckboxGroup(grp);
lab.setBackground(Color.orange);
ckb1.addItemListener((ItemListener) frm);
ckb2.addItemListener((ItemListener) frm);
frm.add(ckb1);
frm.add(ckb2);
frm.add(lab);
frm.setVisible(true);
frm.addWindowListener(new WindowAdapter(){ //視窗右上角x功能
public void windowClosing(WindowEvent e){
System.exit(0);
}
});
}
@Override
public void itemStateChanged(ItemEvent e) {
if(ckb1.getState()==true)
lab.setText("Java");
else if(ckb2.getState()==true)
lab.setText("PHP");
}
}
//============================================================////app3.java
import java.awt.*;
import java.awt.event.*;
public class app3 extends Frame implements ActionListener{
static app3 frm=new app3();
static Label lab=new Label("Hellow JAVA",Label.CENTER);
static MenuBar mb=new MenuBar();
static Menu menu1=new Menu("Style");
static Menu menu2=new Menu("Exit");
static MenuItem mi1=new MenuItem("plane");
static MenuItem mi2=new MenuItem("bold");
static MenuItem mi3=new MenuItem("italic");
static MenuItem mi4=new MenuItem("close window");
//Dialog --> 要呼叫 show() method 才可以顯示
static Button close_btn=new Button("Close");
static Button cancel_btn=new Button("Cancel");
static Dialog dlg=new Dialog(frm);
static WinLis wlis=new WinLis();
public static void main(String args[]){
mb.add(menu1);
mb.add(menu2);
menu1.add(mi1);
menu1.add(mi2);
menu1.add(mi3);
menu2.add(mi4);
mi1.addActionListener(frm);
mi2.addActionListener(frm);
mi3.addActionListener(frm);
mi4.addActionListener(frm);
lab.setFont(new Font("Dialog",Font.PLAIN,24));
frm.add(lab);
frm.setSize(280,150);
frm.setTitle("app_3 Programmer");
frm.setMenuBar(mb);
frm.setVisible(true);
dlg.setTitle("Are you sure?");
dlg.setSize(140,100);
dlg.setLayout(new FlowLayout(FlowLayout.CENTER,5,30));
dlg.add(close_btn);
dlg.add(cancel_btn);
close_btn.addActionListener(frm);
cancel_btn.addActionListener(frm);
frm.addWindowListener(wlis);
/*frm.addWindowListener(new WindowAdapter(){ //視窗右上角x功能
public void windowClosing(WindowEvent e){
System.exit(0);
}
});*/
}
static class WinLis extends WindowAdapter{
public void windowClosing(WindowEvent e){
dlg.setLocation(80, 30);
dlg.show();
}
}
@Override
public void actionPerformed(ActionEvent e) {
//MenuItem mi=(MenuItem)e.getSource();
if(e.getSource()==mi1)
lab.setFont(new Font("Dialog",Font.PLAIN,30));
else if(e.getSource()==mi2)
lab.setFont(new Font("Dialog",Font.BOLD,30));
else if(e.getSource()==mi3)
lab.setFont(new Font("Dialog",Font.ITALIC,30));
else if(e.getSource()==mi4)
frm.dispose();//關閉式窗
//Button btn=(Button)e.getSource();
else if(e.getSource()==close_btn){
dlg.dispose();
frm.dispose();
}
else if(e.getSource()==cancel_btn){
dlg.hide(); //隱藏
}
}
}
//============================================================//
2015年10月5日 星期一
JAVA SL-275_10/04
JAVA SL-275_10/04
Date: 10/04
List
作用是收集物件,並以索引益式保留收集的物件順序。
ArrayList
在陣列中的排序使用可以得到較快的速度,
如果是需要調整索引順序時,則會有較差的表現。
LinkedList
在實作 List 介面時,採用了 (Link) 結構。
first > Object > Object > Object
next next next
Node Node Node
如果要指定索引隨機存取物件時,不建議用 LinkedList,其每次存取都會從頭 (first ) 開始,
但若只是調整索引順序,從還是可以使用 LinkedList。
//================================================================//
支援佇列操作的 Queue
繼承自 Collection,所以它也具有 Collection 的 add(), remove(), element() 等方法。
一操作失敗時,會拋出例外
Queue 定義了自己的 offer(), poll(), pee,() 等方法。
一操作失敗時會傳回特定值
offer() 用來在佇列後端加入物件
成功→True, 失敗→false
poll() 取出佇列前端物件,若佇列為空則傳回 null.
peek() 取得(但不取出)佇列前端物件,若佇列為空則傳回 null.
//================================================================//
想對佇列的前端與尾端進行操作,在前端加入物件與取出物件,在尾端加入與取出物件, Queue 的子介面 Deque 就定義了這類行為。
addFirst(), removeFirst(), getFirst().
addLast(), removeLast(), getLast().
操作失敗時會傳回例外
offerFirst(), pollFirst(), peekFirst().
offerLast(), pollLast(), peekLast().
操作物敗時會傳回特定值
//================================================================//
排序收集的物件
java.util.Collection 提供有 sort() 方法,由於必須有索引才能進行排序,
因此 Collection 的 sort() 方法接受 List 實作的物件。
//================================================================//

//================================================================//
Date: 10/04
List
作用是收集物件,並以索引益式保留收集的物件順序。
ArrayList
在陣列中的排序使用可以得到較快的速度,
如果是需要調整索引順序時,則會有較差的表現。
LinkedList
在實作 List 介面時,採用了 (Link) 結構。
first > Object > Object > Object
next next next
Node Node Node
如果要指定索引隨機存取物件時,不建議用 LinkedList,其每次存取都會從頭 (first ) 開始,
但若只是調整索引順序,從還是可以使用 LinkedList。
//================================================================//
支援佇列操作的 Queue
繼承自 Collection,所以它也具有 Collection 的 add(), remove(), element() 等方法。
一操作失敗時,會拋出例外
Queue 定義了自己的 offer(), poll(), pee,() 等方法。
一操作失敗時會傳回特定值
offer() 用來在佇列後端加入物件
成功→True, 失敗→false
poll() 取出佇列前端物件,若佇列為空則傳回 null.
peek() 取得(但不取出)佇列前端物件,若佇列為空則傳回 null.
//================================================================//
想對佇列的前端與尾端進行操作,在前端加入物件與取出物件,在尾端加入與取出物件, Queue 的子介面 Deque 就定義了這類行為。
addFirst(), removeFirst(), getFirst().
addLast(), removeLast(), getLast().
操作失敗時會傳回例外
offerFirst(), pollFirst(), peekFirst().
offerLast(), pollLast(), peekLast().
操作物敗時會傳回特定值
//================================================================//
排序收集的物件
java.util.Collection 提供有 sort() 方法,由於必須有索引才能進行排序,
因此 Collection 的 sort() 方法接受 List 實作的物件。
//================================================================//

//================================================================//
//MapDemo.java
import java.util.*;


public class MapDemo {
 public static void main(String args[]){
  HashMap t = new HashMap();
  t.put("A", "SCJP");
  t.put(new Integer(100),new Integer(200));
  t.put(new Object(),"SCBCD");
  t.put(null, null);
  System.out.println(t.toString());
  System.out.println("keyA:"+t.get("A"));
  System.out.println("keyB:"+t.get("B"));
 }
}
//================================================================////取間值
import java.util.*;
import java.util.Map.Entry;
public class MapkeyValue {
public static void main(String args[]){
Map<String,String> map = new TreeMap<>();
map.put("one","一");
map.put("two","二");
map.put("three","三");
foreach(map.entrySet());
}
private static void foreach(Iterable<Map.Entry<String,String>>iterable){
for(Map.Entry<String, String> entry:iterable){
System.out.printf("鑑%s 值%s %n", entry.getKey(), entry.getValue());
}
}
}
//================================================================////Message.java
import java.util.Map;
import java.util.Scanner;
import java.util.*;
public class Messages {
public static void main(String args[]){
Map<String,String> messages = new HashMap<>();
messages.put("Justin","Hello Justin的訊息");
messages.put("Monic","給Monic的禮物");
messages.put("Irene","Irene的喵喵叫");
Scanner scanner = new Scanner(System.in);
System.out.print("取得誰的訊息");
String str = messages.get(scanner.nextLine());
System.out.println(str);
System.out.println(messages);
}
}
//================================================================////NewClass.java
import java.util.*;
public class NewClass {
public static void main(String args[]){
Queue q = new LinkedList();
q.offer("First");
q.offer("Second");
q.offer("Third");
Object o;
System.out.println(q.toString());
/* while((o = q.poll()) != null){
String s = (String)o;
System.out.print(s+" ");
}*/
while((o = q.peek()) != null){ //跑無窮迴圈
String s = (String)o;
System.out.print(s+" ");
q.remove();
}
System.out.println(q.toString());
}
}
//================================================================////QueueDemo.java
import java.util.*;
public class QueueDemo {
public static void main(String args[]){
Queue<String> q = new LinkedList<String>();
q.offer("SCJP");
q.offer("SCWCD");
q.offer("SCBCD");
System.out.println(q.toString()+" ");
Iterator a = q.iterator();
while(a.hasNext()){
String s = (String)a.next();
System.out.print(s+" ");
}
}
}
//================================================================////RequestQueue.java
import java.util.*;
interface Request{
void execute();
}
public class RequestQueue {
public static void main(String args[]){
Queue requests = new LinkedList();
//模擬請求加入佇列
for(int i=1;i<6 execute="" i="" math.random="" n="" new="" null="" pre="" private="" process="" public="" request.execute="" request="(Request)requests.poll();" requests.offer="" requests.peek="" requests="" s="" static="" system.out.printf="" ueue="" void="" while="">
//================================================================//
練習:
Link.java、LinkDemo.java、SimpleLinkedList.java
//Link.java.java
class Link{
private class Node{
Object o;
Node next;
Node(Object o){
this.o=o;
}
}
private Node first;
public void add(Object o){
Node last;
if(first==null){
first=new Node(o);
}
else{
last=first;
while(last.next!=null){
last=last.next;
}
last.next=new Node(o);
}
}
public Object get(int index){
int size=size();
if(index>=size){
throw new IndexOutOfBoundsException(String.format("Index:%d, size:%d",index,size));
}
int count=0;
Node last=first;
while(count<index){
last=last.next;
count++;
}
return last.o;
}
public int size(){
if(first==null)
return 0;
Node last=first;
int count=1;
while(last.next!=null){
last=last.next;
count++;
}
return count;
}
}
//LinkDemo.java
public class LinkDemo {
public static void main(String args[]){
Link l = new Link();
String s0 = "hello-0";
String s1 = "hello-1";
String s2 = "hello-2";
String s3 = "hello-3";
l.add(s0);
l.add(s1);
l.add(s2);
l.add(s3);
System.out.println(l.size());
System.out.println((String)l.get(3));
System.out.println((String)l.get(0));
}
}
//SimpleLinkedList.java
public class SimpleLinkedList {
private class Node{
//將收集的物件用/vode封裝
Node(Object o){
this.o=o;
}
Object o;
Node next;
}
private Node first; //第一個節點
public void add(Object o){ //新增一個Node封裝物件,並由上一個o Node物件參考
if(first == null){
first=new Node(o);
}
else{
Node last = first;
while(last.next != null){
last=last.next;
}
last.next=new Node(o);
}
}
public int size(){ //走訪所有Node計數並取得長度
int count=0;
Node last=first;
while(last.next != null){
last=last.next;
count++;
}
return count;
}
public Object get(int index){ //走訪所有Node計數並取得對應索引順序
int size=size();
if(index > size){
throw new IndexOutOfBoundsException(
String.format("Index: %d,Size: %d", index, size));
}
int count=0;
Node last=first;
while(count < index){
last=last.next;
count++;
}
return last.o;
}
}
//================================================================//
import java.util.*;
class Account implements Comparable{
private String name;
private String number;
private int balance;
Account(String name,String number,int balance){
this.name=name;
this.number=number;
this.balance=balance;
}
public String toString(){
return String.format("Account(%s %s %d)",name,number,balance);
}
public int comparTo(Object o){
Account other=(Account)o;
return this.balance-other.balance;
}
@Override
public int compareTo(Object o) {
// TODO Auto-generated method stub
return 0;
}
}
public class Sort2 {
public static void main(String arg[]){
List accounts=Arrays.asList(
new Account("Justin","x1234",1000),
new Account("Monic","x5678",500),
new Account("Irene","x2345",100)
);
Collections.sort(accounts);
System.out.println(accounts);
}
}
//================================================================//
//Stack.java
import java.util.*;
public class Stack {
private Deque deque = new ArrayDeque();
private int capacity;
public Stack(int capacity){
this.capacity=capacity;
}
public boolean push (Object o){
if(deque.size()+1 > capacity){
return false;
}
return deque.offerLast(o);
}
public Object pop( ){
return deque.pollLast();
}
public Object peek(){
return deque.peekLast();
}
public int size(){
return deque.size();
}
public static void main(String args[]){
Stack stack = new Stack(4);
stack.push("Justin");
stack.push("Lisa");
stack.push("John");
System.out.println(stack.pop());
System.out.println(stack.peek());
System.out.println(stack.size());
}
}
//================================================================//
2015年10月4日 星期日
程式語言那麼多,為什麼 Google 偏愛 JS?
程式語言那麼多,為什麼 Google 偏愛 JS?
轉貼自:http://buzzorange.com/techorange/2015/09/29/google-javascript/
2015年10月3日 星期六
訂閱:
文章 (Atom)